Uni-corn tutorial.
This tutorial will guide you in writing a web application in stip.js
The application
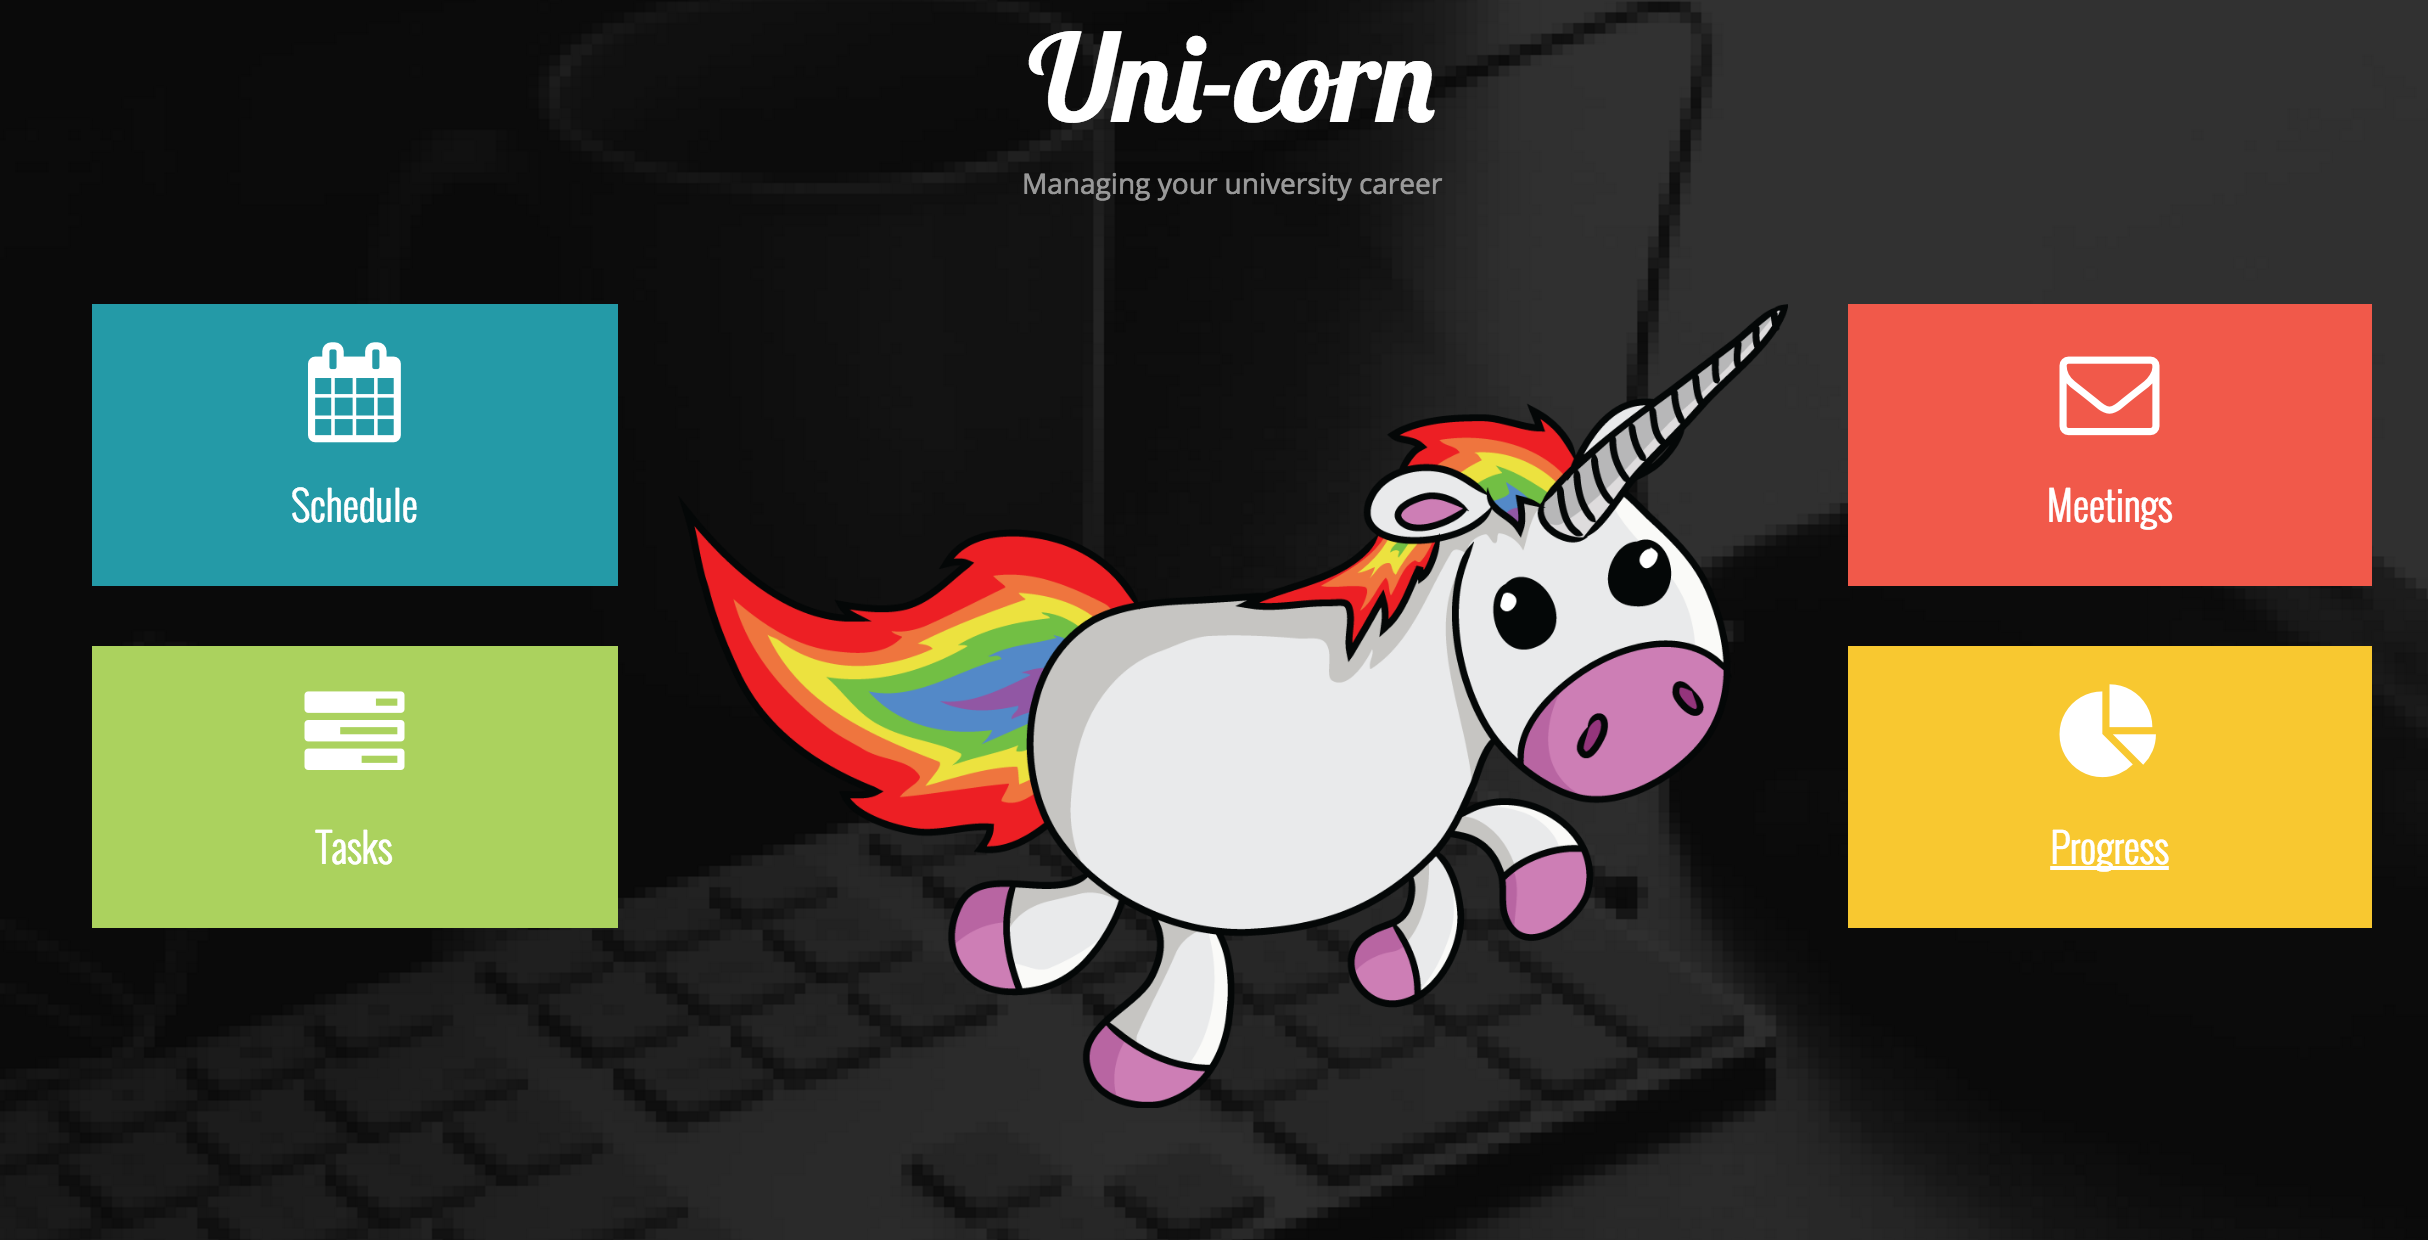
This application can be used by students who want to manage their “uni-versity” careeer: keeping track of tasks, meetings and classes. The calendar and progress overview pages visualise how the student is advancing.
For this application we make use of several JavaScript libraries:
- later.js to express repeating schedules
- highcharts to display the progress of the student
- twitter bootstrap calendar to show the calendar
- twitter bootstrap date+time picker
Tierless JavaScript: slices + annotations
The code is structured in terms of slices: blocks of code, annotated with a name. These slices contain tierless JavaScript code: plain JS, where functions can be called and defined in a sequential, local way without the need for explicit constructs for remote communication or data replication. Fixed slices are assigned to a certain tier: client or server. If you’re not sure where a slice should be, you can let the tool decide: it will make sure that the slice ends up where it should be!
We define two fixed slices in this case: one for the server and one for the client tier. The server slice contains the code that reads in a file located on the server and declares the replicated data. The client tier contains all the code that is responsible for rendering the data in the browser.
The main idea is that slices that perform a tier-specific task, like reading from a database or updating the DOM, have a fixed placement.
Server slice
/* @require [fs later]
   @slice setup */
{
  later.date.localTime();

  /* @observable */
  var courses = [];

  /* @observable */
  function Course(title, duration, time) {
    this.title = title;
    this.duration = duration;
    this.time = time;
  }

  function isValidTimeDescr (descr) {
    var sched = later.parse.text(descr);
    // no error => -1
    return sched.error === -1;
  }

  var dataCourses = fs.readFile('data.json');
  var coursesJSON = JSON.parse(dataCourses);
  coursesJSON.forEach(function (json) {
    if (!isValidTimeDescr(json.time))
      throw new Error('Wrong time description in course');
    var course = new Course(json.title, json.duration, json.time);
    courses.push(course);
  })
}
We define our first slice setup with the @slice name annotation.
This annotation is placed inside comments, so other developer tools, like your favorite IDE, will ignore it.
A @slice annotation is followed by a block statement, in which you define the code that belongs to that slice.
We also use the @require [libraries] annotation, this makes sure that the correct libraries will be required in the resulting server side code.
We have two declarations with a data sharing annotation: the courses collection and the constructor function for a Course.
Using the @observable annotation, the tool makes sure that every client receives a replica of the data and its updates, but clients cannot change the data itself.
In this case, the classes are processed from a file, but it could contact a remote service as well.
If clients should be allowed to change the data as well, the @replicated annotation can be used.
We define an auxiliary function that checks if a given time description is valid.
After that we read in the classes from the data.json file, make a new Course, and add it to the courses collection.
Client slice
/* @slice browser */
{
  function displaySchedule() {
    var schedule = [];
    courses.forEach(function (course) {
      var nextDate = calculateNext(course.time);
      var prevDate = calculatePrevious(course.time);
      var endNextDate = addMinutes(nextDate, course.duration);
      var endPrevDate = addMinutes(prevDate, course.duration);
      var next = {title: course.title, start: nextDate.getTime(), end: endNextDate.getTime(), class: "event-info"};
      var prev = {title: course.title, start: prevDate.getTime(), end: endPrevDate.getTime(), class: "event-info"};
      schedule.push(next);
      schedule.push(prev);
    })
    var calendar = $("#calendar").calendar({
      tmpl_path : "tmpls/",
      view : "week",
      events_source: schedule
    });
    calendar.view();
  }

  function addMinutes(date, minutes) {
    var ms = date.getTime();
    return new Date(ms + minutes * 60000);
  }

  function calculateNext(timeDescription) {
    var parsed = later.parse.text(timeDescription);
    var s = later.schedule(parsed);
    var next = s.next(1);
    return new Date(next);
  }

  function calculatePrevious(timeDescription) {
    var parsed = later.parse.text(timeDescription);
    var s = later.schedule(parsed);
    var next = s.prev(1);
    return new Date(next);
  }

}
We define a second slice, browser, that defines a displaySchedule function, which will be called from the UI.
It loops over the courses collection from the setup slice.
Because we used the @observable data sharing annotation for the courses variable, we know that the client will receive a replica of this variable.
This way, we can safely use the variable, even though we know that this slice will end up on the client tier.
We calculate for every class the previous and next instance of a class and add it to the schedule of the calendar view.
This is done by the auxiliary functions addMinutes, calculateNext and calculatePrevious.
For simplicity reasons we calculate only two instances, but normally you should calculate more instances.
Slice placement
/* @config:
     browser client
     setup server  */
The placement of the fixed slices can be defined through the @config annotation, inside comments.
Put this configuration on top of all code and map the name of the slices to their respective tier.
In this case we have only two slices that both have a fixed placement: the browser slice on the client and the setup slice on the server.
Adding more slices
The most interesting part of the application are the tasks and the meetings functionalities. They both have a dedicated page where new data can be entered, updated and viewed.
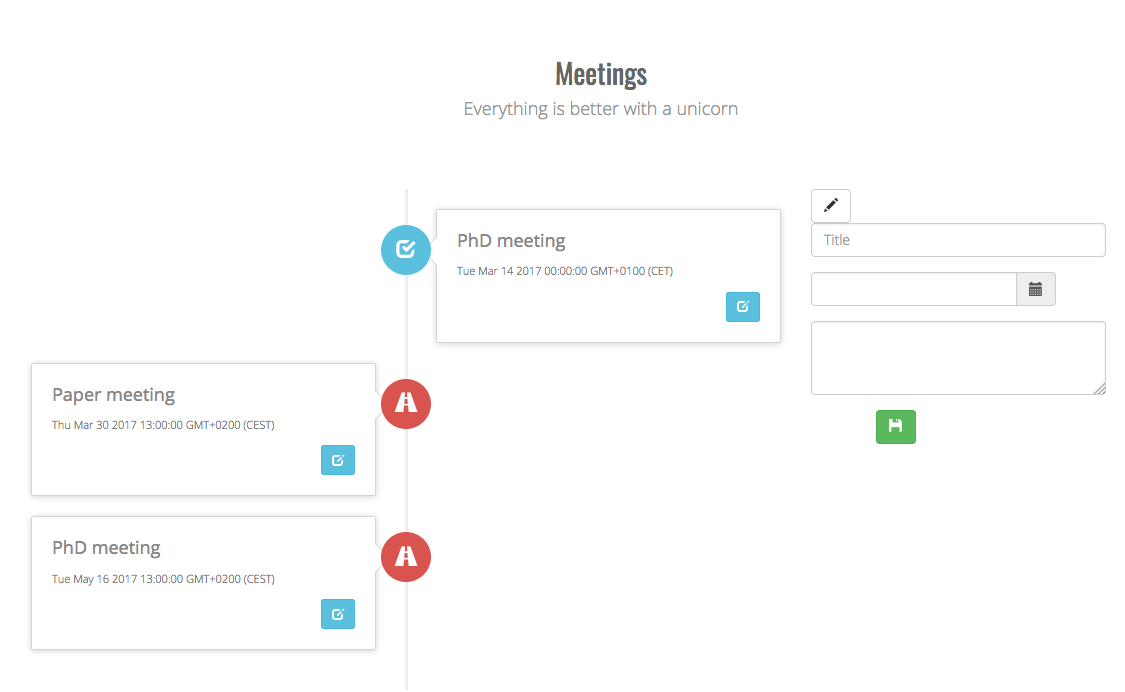
The definition, updating and views of meetings and tasks are alike, so we only show how all this is done for tasks.
Tasks
First of all, we define a replicated data set to store the tasks and a constructor functions to create new tasks.
We add this to the setup slice defined previously.
/* @slice setup */
{
  /* @replicated */
  var tasks = [];

  /* @replicated */
  function Task(title, priority) {
    this.title = title;
    this.status = -1;
    this.priority = priority;
  }

  addTask("Learn uni-corn!", 10);
}
Both the declaration of the collection and the function constructor are replicated:
this means that tasks added to the collection are automatically propagated to every client,
and every chance to a Task instance is synchronised, even when the change comes from a client.
Adding a new slice
The final application will have three collections: classes, tasks and meetings.
We define getters, setters and sorting functions on these collections.
Because the collections are replicated, we define a new slice that contains this code and we let the tool figure out where the code should end up.
For this reason, we don’t need to update the @config placement of the slices, because we now define a free or unplaced slice.
/* @slice getters+setters */
{
  function getTasks()   {
    return tasks;
  }
  function getCourses() {
    return courses;
  }
  function addTask(title, priority) {
    var task = new Task(title, priority);
    tasks.push(task);
  }

  function addCourse(title, duration, time) {
    var course = new Course(title, duration, time);
    courses.push(course);
  }

  function sortTasks () {
    var tasks = getTasks();
    tasks.sort(function (t1, t2) {
      if (t1.status == t2.status)
        return t1.priority - t2.priority;
      else
        return t1.status - t2.status;
    })
  }

}
Display functions
On the browser slice we add code to display and update the tasks collection or a specific task.
/* @slice browser */
{
  var taskTitle = "";
  var taskPriority = "";

  function addTaskUI() {
    addTask(taskTitle, taskPriority);
    sortTasks();
    taskTitle = "";
    taskPriority = "";
  }

  function nextStatusTaskUI (ev) {
    var idx = ev.index;
    var tasks = getTasks();
    var task = tasks[idx];
    var now = new Date();
    if (task.status < 1) {
      task.status = task.status + 1;
      task.lastUpdate = now.getTime();
    }
    sortTasks();
    updateActivity();
  }
We define two functions that will be called when a button is clicked: one to add a new task and one to edit an existing task. A task update is basically a change in the status: from to begin, to ongoing, to finished. We also declare two variables initialised as an empty string. When adding a new task, we use their values as the title and priority of the task. Afterwards, we reset them to the empty string. These variables are actually reactive variables: they are used in the UI and can be updated by the user in a form.
The HTML part
To define the UI part, we can use the @ui annotation, that takes HTML templating code from Redstone.
For the UI part for the tasks we have:
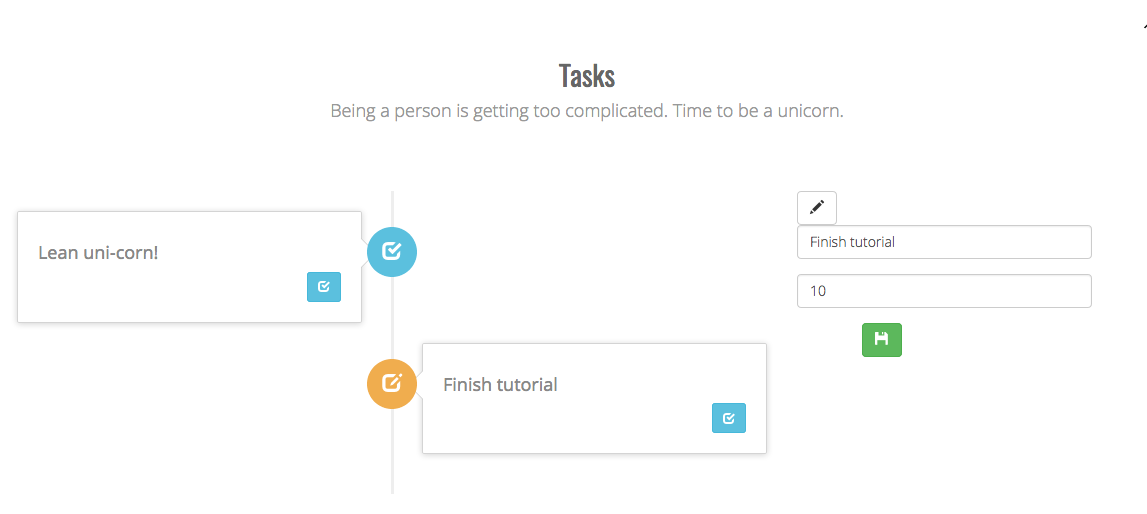
/* @ui */
div#tasks-modal[class=section-modal]
  div[class=modal-content]
    div[class=container]
      div[class=row]
        div[class=section-title text-center]
          h3 Tasks
          p Being a person is getting too complicated. Time to be a unicorn.
      div[class=row]
        div[class=col-md-8]
          ul[class=timeline]
            {{#each tasks}}
              li[class={{status < 1 ? "timeline-inverted" : ""}}]
                {{#if status == 1}}
                  i[class=glyphicon-check]
                {{#else}}
                  {{#if status == 0}}
                    i[class=glyphicon-edit]
                  {{#else}}
                    i[class=glyphicon-road]
                div[class=timeline-panel]
                  h4[class=timeline-title] {{title}}
                  button[@click=nextStatusTaskUI]
                    i[class=glyphicon-check]

        div[class=col-md-4]
          div#task-form[class=form-horizontal]
            div[class=form-group]
              label[for=task-title] Title
              input[value={{taskTitle}}]
            div[class=form-group]
              label[for=taskPriority]
              input[value={{taskPriority}}]
            div[class=form-group]
               button[@click=addTaskUI]#send
                 i[class=glyphicon-floppy-disk]
We install the event listeners addTaskUI and nextStatusTaskUI on the buttons itself.
In the form we refer to the variables defined in the browser slice.
The Redstone runtime makes sure that every change to the variable is reflected in the UI and vice versa.
, control structures are used to loop over the task collection, for example.
Every time a new task is inserted in the collection, the UI updates reactively.
For the styling we use Twitter Bootstrap.
Tracking progress in a new slice
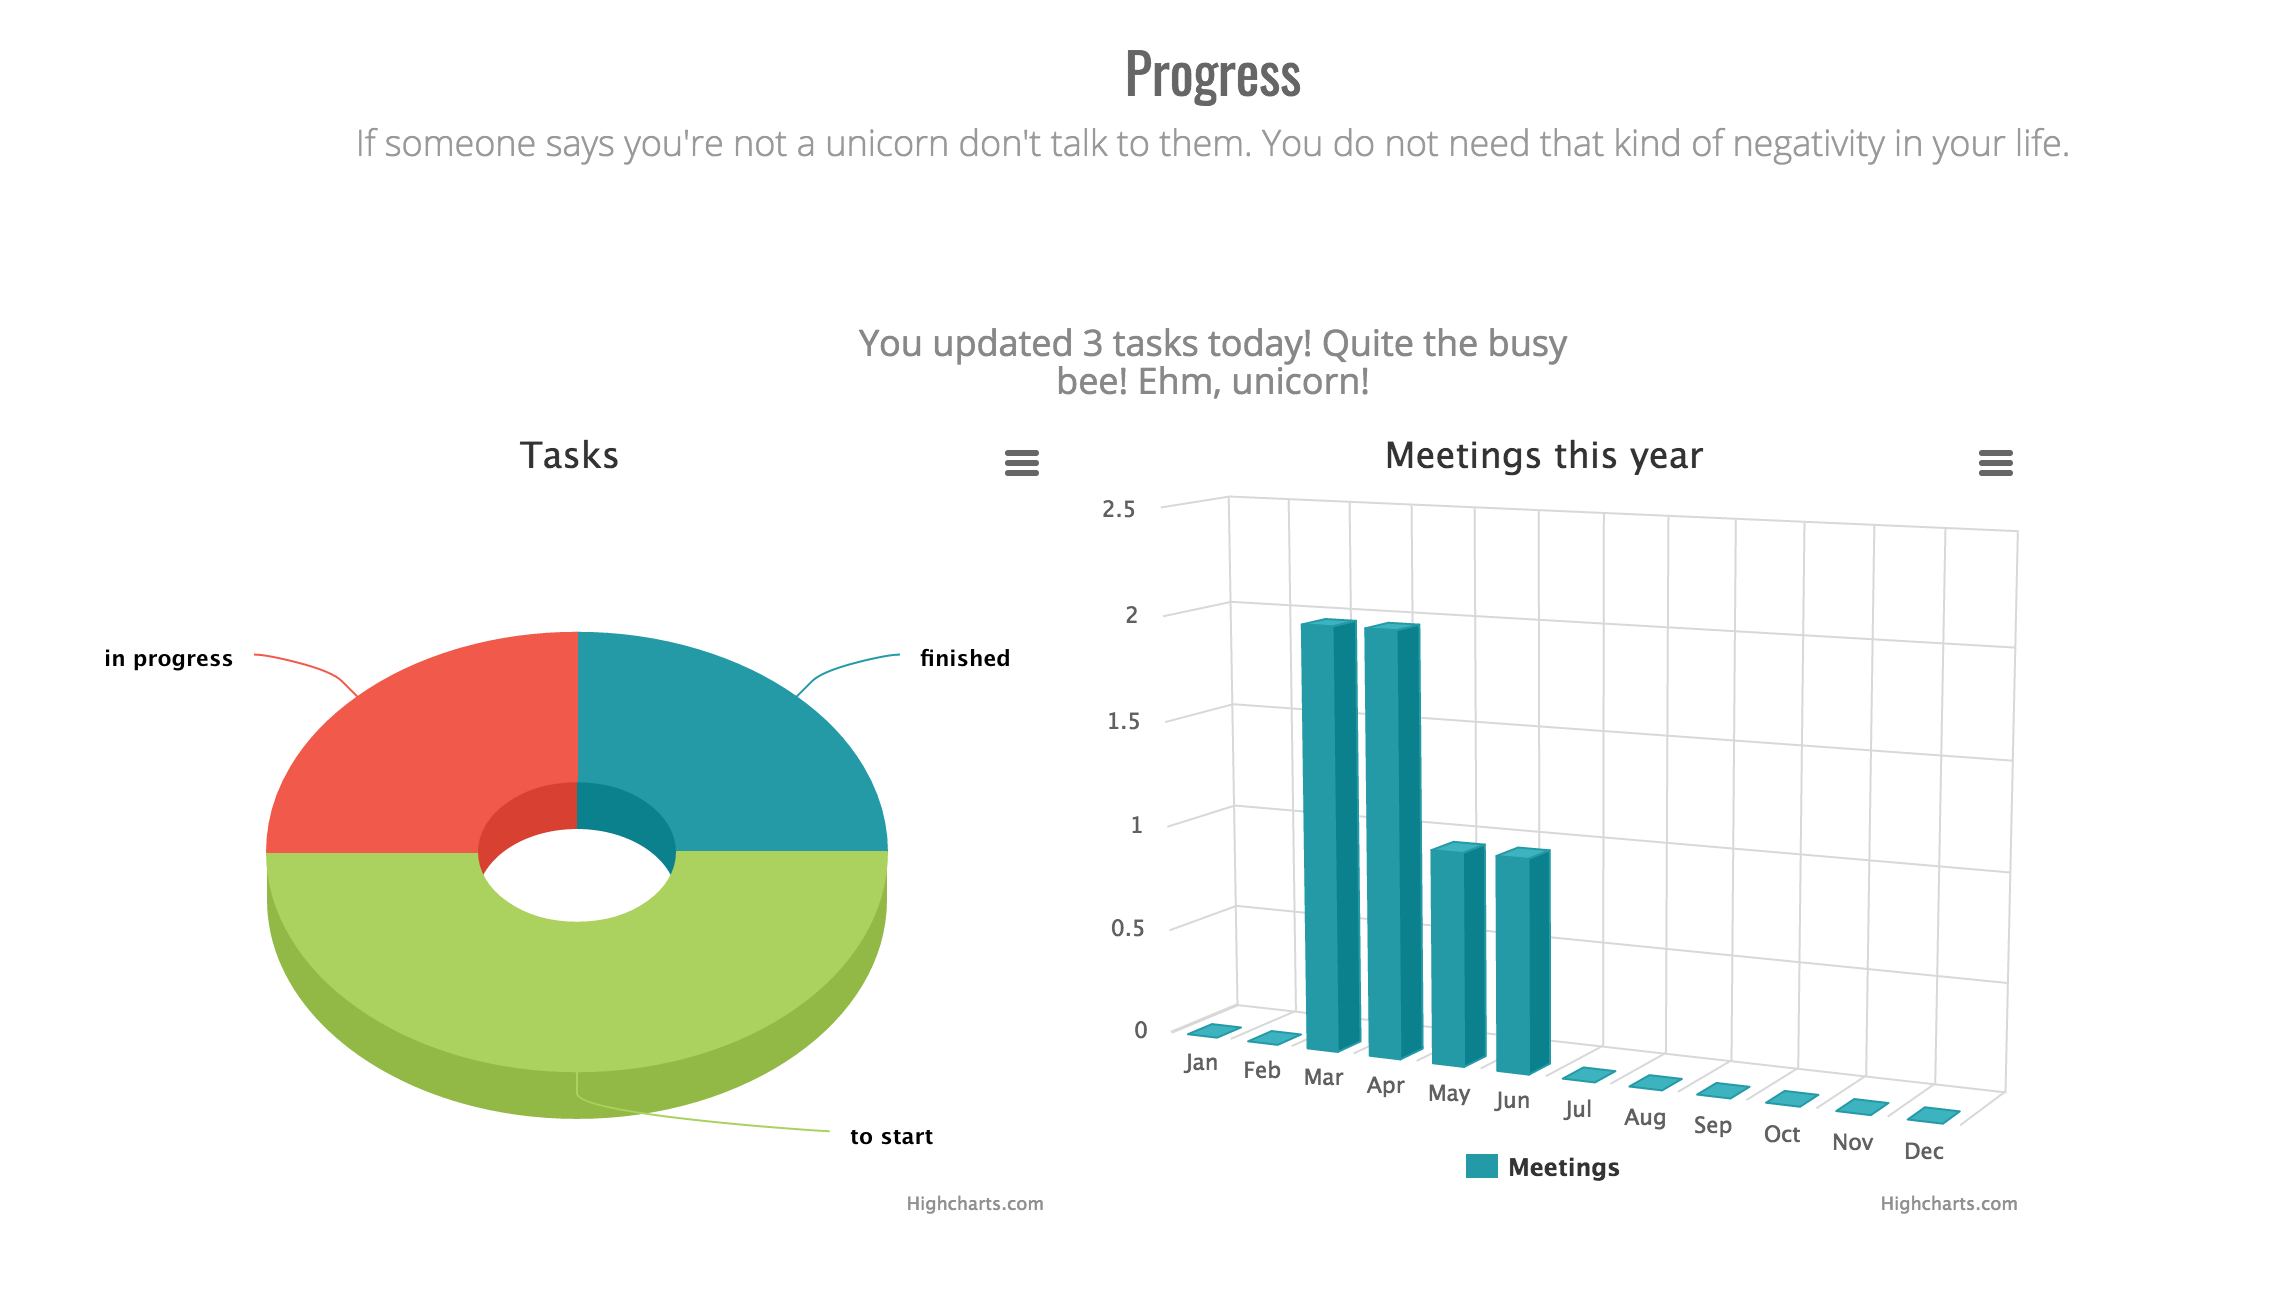
An important aspect of the application is the progress page where the progress of the student is visualised. For this we need keep track of the number of tasks that are updated on the current date. We also display a chart of meetings per month and a pie chart of the tasks.
/* @slice statistics */
{
  var activityToday = 0;
  var latestUpdate = false;

  function updateActivity () {
    var now = new Date();
    if (latestUpdate) {
      if (happenedToday(latestUpdate, now)) {
        activityToday = activityToday + 1;
        latestUpdate = now;
      } else {
        activityToday = 1;
        latestUpdate = now;
      }
    } else {
      latestUpdate = now;
      activityToday = activityToday + 1;
    }
  }

  function processTasksStatus () {
    var todo = 0;
    var finished = 0;
    var inprogress = 0;
    var tasks = getTasks();
    tasks.forEach(function (task) {
      if (task.status < 0)
        todo++;
      else if (task.status > 0)
        finished++;
      else
        inprogress++;
    });
    return [todo, finished, inprogress]
  }

}
The new statistics slice has an updateActivity function that must be called every time a task is updated.
The processTasksStatus function returns the number of tasks for each task status.
Because we don’t perform tier-specific operations inside this slice, we make it an unplaced slice.
Automatic tier placement
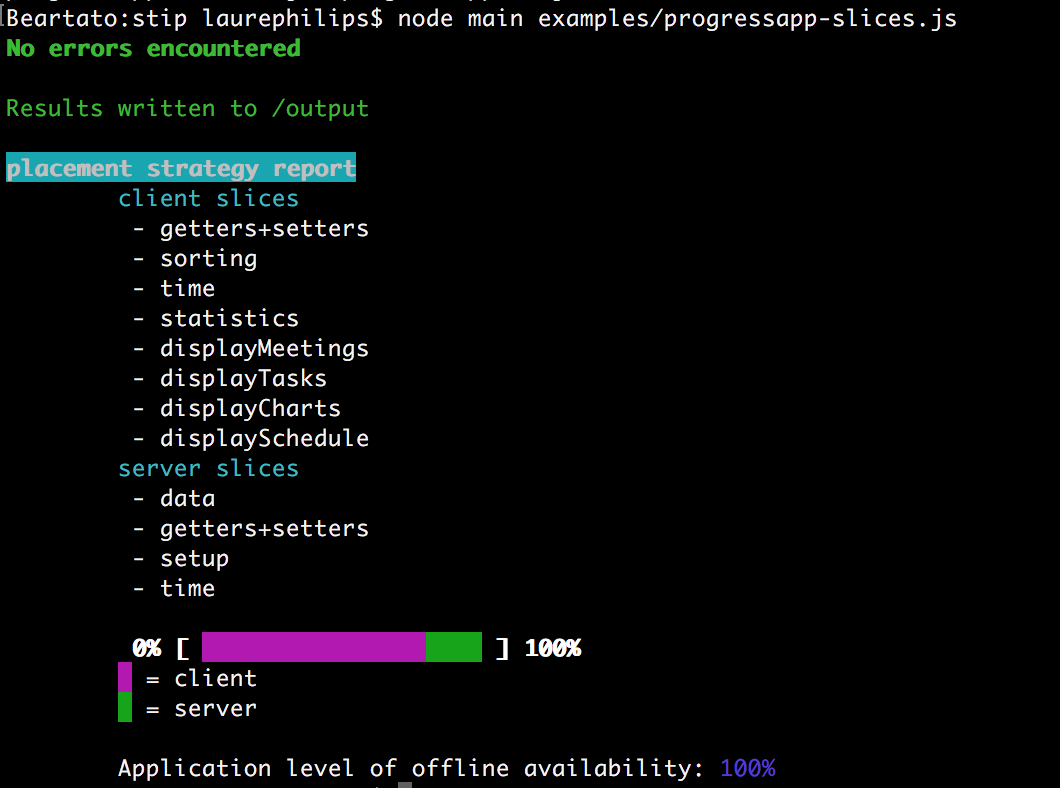
The complete source code can be found here. Before the program transformations can insert distributed code into the application, a placement for every unplaced slice must be computed. The stip.js tool has a recommender system that focuses on the offline availability of the application. For this, the system first tries to optimise the placement of the unplaced slices, and secondly it reports possible slice refinements back to the user. Slice refinements could be adding annotations or moving certain definitions to a new slice. When following up on the advice, the recommender system can generate a placement that results in a better offline availability. When trying to maximise the offline availability, some slices can be placed on the server and client tier. If the client heavily depends on the code of that slice, the resulting application will perform less round-trips to the server.
For example, when we define only two slices, the tool will give a lot of advice on how to improve the code. It also returns an approximation, based on static analysis, on how well the configuration scores on offline availability.

By following up on the advice (and running the final version of our Uni-corn app), we get the following results: